
How to: Hockey Stickhandling
Introduction
Let’s turn those stone hands into silky soft mitts. The best place to start is to lay down a solid foundation of the basics. We’ll be going over stickhandling tips that dive deep into the fundamentals.
How to Hold a Hockey Stick
As promised, we’ll start off with the most basic aspect of stickhandling - holding the hockey stick. If you’re a beginner or even an older player picking up the game the following shouldn’t be too hard to get a grasp on. But, it is important to get right.

Top Hand
The top hand holding the end of the shaft (ie. the top). This shouldn’t be shocking but there is some nuance that we’ll get into later.
When grabbing the top of the stick make a ‘V’ with your thumb and index finger. Look for the 'V' when holding the stick out in front of you. If you can't see the 'V' adjust your grip.
The position of where you grip the stick has some variations. The most popular is to grasp the stick with your whole hand at, or a smidge lower than, the very top of the stick. This allows a strong grip and good mobility in the wrist.
An alternative approach is to grasp the stick with the finger(s) overhanding the top of the shaft. The pinky or additionally the ring finger is most common. This allows for more wrist mobility but a weaker grip.
If the shaft's butt end is sticking out consider cutting the stick shorter.
Bottom Hand
Look at the palm of your bottom hand. Now make a fist. Do you see the base of the thumb? Some use this area to check the doneness of steak but we’re using this for another purpose. The base of the thumb, when gripping a hockey stick, wraps over top of the stick. Remember to have a loose grip with the bottom hand as it’ll need to slide along the shaft.
Neutral, Wide and Narrow Grips

Neutral Grip
The most common and best place to start off is the neutral grip. In this grip, your bottom hand should be about a forearm’s length away from your top hand. Or another way to think of it is about your shoulder-width apart. The neutral allows the elbows to be at your side with your hands straight out in front of the body.
From the neutral position, we can shoot, pass, stickhandle or change into the other grips. The player is quite dangerous in a neutral position.
Wide Grip
The wide grip will allow us to handle the puck close to the body. Situations such as receiving the puck near the skates or pulling the puck in close.
Now there’s no one exact spot where we put our hand to have a wide grip. It all depends on the situation. As long as the bottom hand is further down the shaft than our neutral grip, we will count it.
Generally, this is a ‘strong’ grip because it will be harder for an opponent to check you by lifting the stick. But, there are fewer options than a neutral grip. Trying to put a hard wrist shot on the net will be a little tougher with a wide grip!
Narrow Grip
The narrow grip extends our range of motion away from the body. Reaching for the puck or toe dragging an opponent are uses for the narrow grip.
Like the wide grip, there is no one exact spot where we put our hand to have a narrow grip. A narrow grip is when the bottom hand is closer to the top hand than the neutral grip.
The narrow grip is a vulnerable position as we cannot defend against a stick lift. Also, when reaching for a puck the center of gravity is higher so it is easier to be knocked off the puck. So be aware!
Building upon the Fundamentals
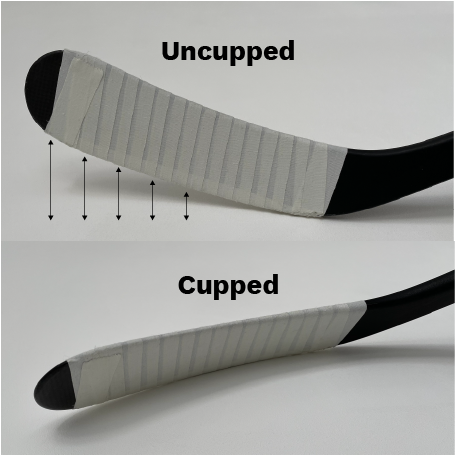
Cupping the Puck
When we’re handling the puck the blade of the stick should maximize the surface area on the ground. This is so that the pesky puck doesn’t sneak under our blade. If the puck is on our forehand we close the blade or ‘cup’ the puck by rotating our top hand down. We rotate our top hand up for the backhand.
Think of the top hand as the conductor of the blade. It will be doing all the twitch movements to close or open the blade.
Slow Is Smooth, Smooth Is Fast
Fast hands equals good, right? This is a common misconception and leads some beginners to ‘chopping’ the puck. The puck isn’t being handled with a purpose when chopping. So what is the purpose of stickhandling if it isn’t to move the puck back and forth fast? Great question - it’s to create space.
If you have a serious case of the chops it is probably due to your bottom hand. The top hand needs to be controlling the blade and can’t do that if the bottom hand grip is too tight. To fix this take an empty toilet paper roll (or PVC pipe) and slide it on your stick. Grip the toilet paper roll with your bottom hand. Stickhandle like usual but try not to crush the toilet paper roll. This will force your upper hand to properly control the puck and the lower hand to slide up and down the hockey stick.
Remember that some situations will call for you to stickhandle quickly and possibly chop the puck. This is fine as long as you have the purpose of creating space in mind.
How to Deke
Basketball players have a stance called a ‘triple threat’ where they are in the position to either pass, dribble, or shoot the ball. Similar to basketball, we want to be in a position to pass, create space, or shoot. The essence of deking is to trick the opponent on what we are about to do. If we’re in a position to pass, protect the puck, or shoot it gives us more options to deceive the opponent.
Upper Body Fakes
One tool in the toolbox is your upper body. Dip your shoulder or point your chest elsewhere to convince the opponent you’re about to do something you’re not. For instance, fake a wrist shot by dropping your shoulder. If you’ve sold it to the defender they may tense up and be caught flat-footed.
Some players find themselves with a rigid upper body due to excitement, nervousness, etc. The problem is that in order to sell your upper body fake we need to be loose. If you find yourself tensing up, concentrate on your breathing.
Head Fakes
A head fake is a quick tilt of the head or looking elsewhere to conceal a pass or shot. By moving your head in one direction the opposing player can read that as your direction of movement allowing you to create space.
A more advanced move would be finding the teammate you want to pass to, look in a different direction and then pass to where your teammate will be. This can help conceal the pass so the opposing player has less opportunity to intercept the pass or for the goalie to get into position.
Scanning the Ice
Contrary to popular belief, hockey players don’t keep their eyes up all the time. The greatest players in today’s game still look down at the puck. However, the more comfortable you are looking up the more information you can take in. Scanning the ice to read the play, knowing where your opponents are, and where your teammates are doing will give you an edge.
In the context of deking, knowing what the opposing player is doing will allow you to exploit it. For instance, is the opposing player crossing over? If so, dish out a fake to convey that you’re going in the same direction of the crossover and cut back the opposite way. You’ll gain time and space or even put the opposing player on their butt.
So when practicing dekes remember to combine upper body and head fakes to create space and survey the ice for opportunities to make plays.
Recommendations
Now time to use this newfound knowledge during your practices and games. If you’re looking for off-ice drills to develop hockey skills click the download button to get the IOS app. We have tons of proven drills to develop your hockey skills and track your progression. No need for some fancy off-ice training aids. All you need is the app, a hockey stick, and some pucks (Green Biscuit pucks are the best for off-ice training).